Mods, Plugins & Addons
Manage mods for Java Edition and addons for Bedrock Edition from the same Minepanel workflow.
Overview
| Edition | Platforms / Sources | Automation |
|---|---|---|
| Java | Modrinth, CurseForge, Spiget | ✅ Automatic |
| Bedrock | Upload .mcaddon / .mcpack / .zip, CurseForge | ✅ Import, enable/disable, sync to world |
Java Edition Platforms
| Platform | Best For | API Key Required |
|---|---|---|
| Modrinth | Mods, datapacks, plugins | ❌ No |
| CurseForge | Modpacks, mods | ✅ Yes |
| Feed The Beast | FTB modpacks | ❌ No |
| Spiget | Spigot/Paper plugins | ❌ No |
Learn More
For advanced options and all environment variables, see the docker-minecraft-server mods documentation.
Paper Cross-Play Template
If you want a Java server that also accepts Bedrock players, Minepanel now includes a Paper Cross-Play template in Create Server -> From Template.
It preconfigures:
GeyserFloodgateViaVersion19132:19132/udpas an extra port for Bedrock connections
This is a preset for faster setup. You can still edit the plugin URLs or extra ports later from the server configuration tabs.
Integrated Mod Search in Minepanel
Minepanel includes an integrated search dialog in the Mods tab for both CurseForge Files and Modrinth Projects.
What it does
- Searches directly from Minepanel (no need to manually browse first)
- Filters results by current server compatibility:
- Minecraft version
- Loader (Forge/Neoforge/Fabric/Quilt) when available
- Adds entries in one click as:
- Slug (default)
- ID
How to use it
- Open Create Server or Edit Server
- Go to the Mods tab
- In either CurseForge Files or Modrinth Projects, click Search mods
- Pick insertion format (Slug or ID)
- Click Add mod
The selected entries are appended to the same existing fields (CURSEFORGE_FILES and MODRINTH_PROJECTS) using newline format, preserving manual entries and avoiding duplicates.
Modrinth
Automatically download and manage mods, plugins, and datapacks from Modrinth.
Supported Server Types
- ✅ Fabric
- ✅ Forge
- ✅ Neoforge
- ✅ CurseForge (AUTO_CURSEFORGE)
- ✅ Modrinth Modpacks
How to Add Mods from Minepanel
- Go to Create Server or Edit Server
- Open the Mods tab
- Find the Modrinth Projects field (blue border)
- Enter project slugs separated by commas or new lines
- Configure dependencies and version type if needed
- Save the server
Example input:
fabric-api
sodium
lithium
cloth-configDatapacks from Modrinth
Modrinth also hosts datapacks. To install them, use the datapack: prefix:
In Minepanel (Modrinth Projects field):
fabric-api
sodium
datapack:terralith
datapack:incendium
datapack:nullscape:1.2.4Syntax:
| Format | Example | Description |
|---|---|---|
datapack:slug | datapack:terralith | Latest version |
datapack:slug:version | datapack:terralith:2.5.5 | Specific version |
datapack:slug:beta | datapack:terralith:beta | Latest beta |
Vanilla Servers
For vanilla servers, the datapack: prefix is optional. The system auto-detects datapacks.
WARNING
Datapacks require a compatible Minecraft version. Check the datapack page on Modrinth for compatibility.
Project Reference Formats
The Modrinth Projects field accepts multiple formats:
| Format | Example | Description |
|---|---|---|
| Slug | fabric-api | Latest release |
| Slug + version | fabric-api:0.119.2+1.21.4 | Specific version |
| Slug + version ID | fabric-api:bQZpGIz0 | By version ID |
| Slug + release type | fabric-api:beta | Latest beta/alpha |
| Project ID | P7dR8mSH | Using Modrinth ID |
| Loader override | fabric:fabric-api | Force loader type |
| Datapack | datapack:terralith | Install datapack |
Configuration Options
| Field | Description | Default |
|---|---|---|
| Modrinth Projects | List of mods/plugins/datapacks | - |
| Dependencies | none, required, or optional | none |
| Version Type | release, beta, or alpha | release |
Auto-Removal
Mods removed from the list will be automatically deleted on next server start.
Docker Compose Reference
If you prefer to configure via docker-compose directly:
environment:
  TYPE: FABRIC
  VERSION: 1.21.4
  MODRINTH_PROJECTS: |
    fabric-api
    sodium
    datapack:terralith
  MODRINTH_DOWNLOAD_DEPENDENCIES: required
MODRINTH_PROJECTS_DEFAULT_VERSION_TYPE: releaseMore docker-compose examples
Forge server with specific versions:
environment:
  TYPE: FORGE
  VERSION: 1.20.1
  MODRINTH_PROJECTS: |
    jei:10.2.1.1005
    geckolib
createUsing a listing file:
Create /path/to/mods.txt:
# Performance mods
fabric-api
sodium
lithium

# Datapacks
datapack:terralith
datapack:incendiumThen mount and reference:
volumes:
  - ./mods-list:/extras:ro
environment:
MODRINTH_PROJECTS: '@/extras/mods.txt'Modrinth Modpacks
Install complete modpacks from Modrinth using the MODRINTH_MODPACK server type.
Installation Methods in Minepanel
When creating/editing a server with type MODRINTH_MODPACK, there is one method which can be used in several ways.
| Method | Auto-updates? | Use case |
|---|---|---|
| Slug | ✅ Yes | Always gets the latest compatible version |
| URL | ✅ Yes | Always gets the latest compatible version |
| URL with verison | ✅ No | Locks to the specified version |
Slug
- Enter the modpack project slug (e.g.,
surface-living) into the Modrinth Modpack field - On each server start, it downloads the latest compatible version
Url
- Enter the modpack project URL (e.g.,
https://modrinth.com/modpack/surface-living) - On each server start, it downloads the latest compatible version
Url (version locked)
- Enter the modpack project URL for a specific version (e.g.,
https://modrinth.com/modpack/surface-living/version/1.2.1) - On each server start, it will ignore any updated version of the modpack
CurseForge Modpacks
Install complete modpacks from CurseForge using the AUTO_CURSEFORGE server type.
API Key Required
You need a CurseForge API key. Get one from CurseForge for Studios.
Installation Methods in Minepanel
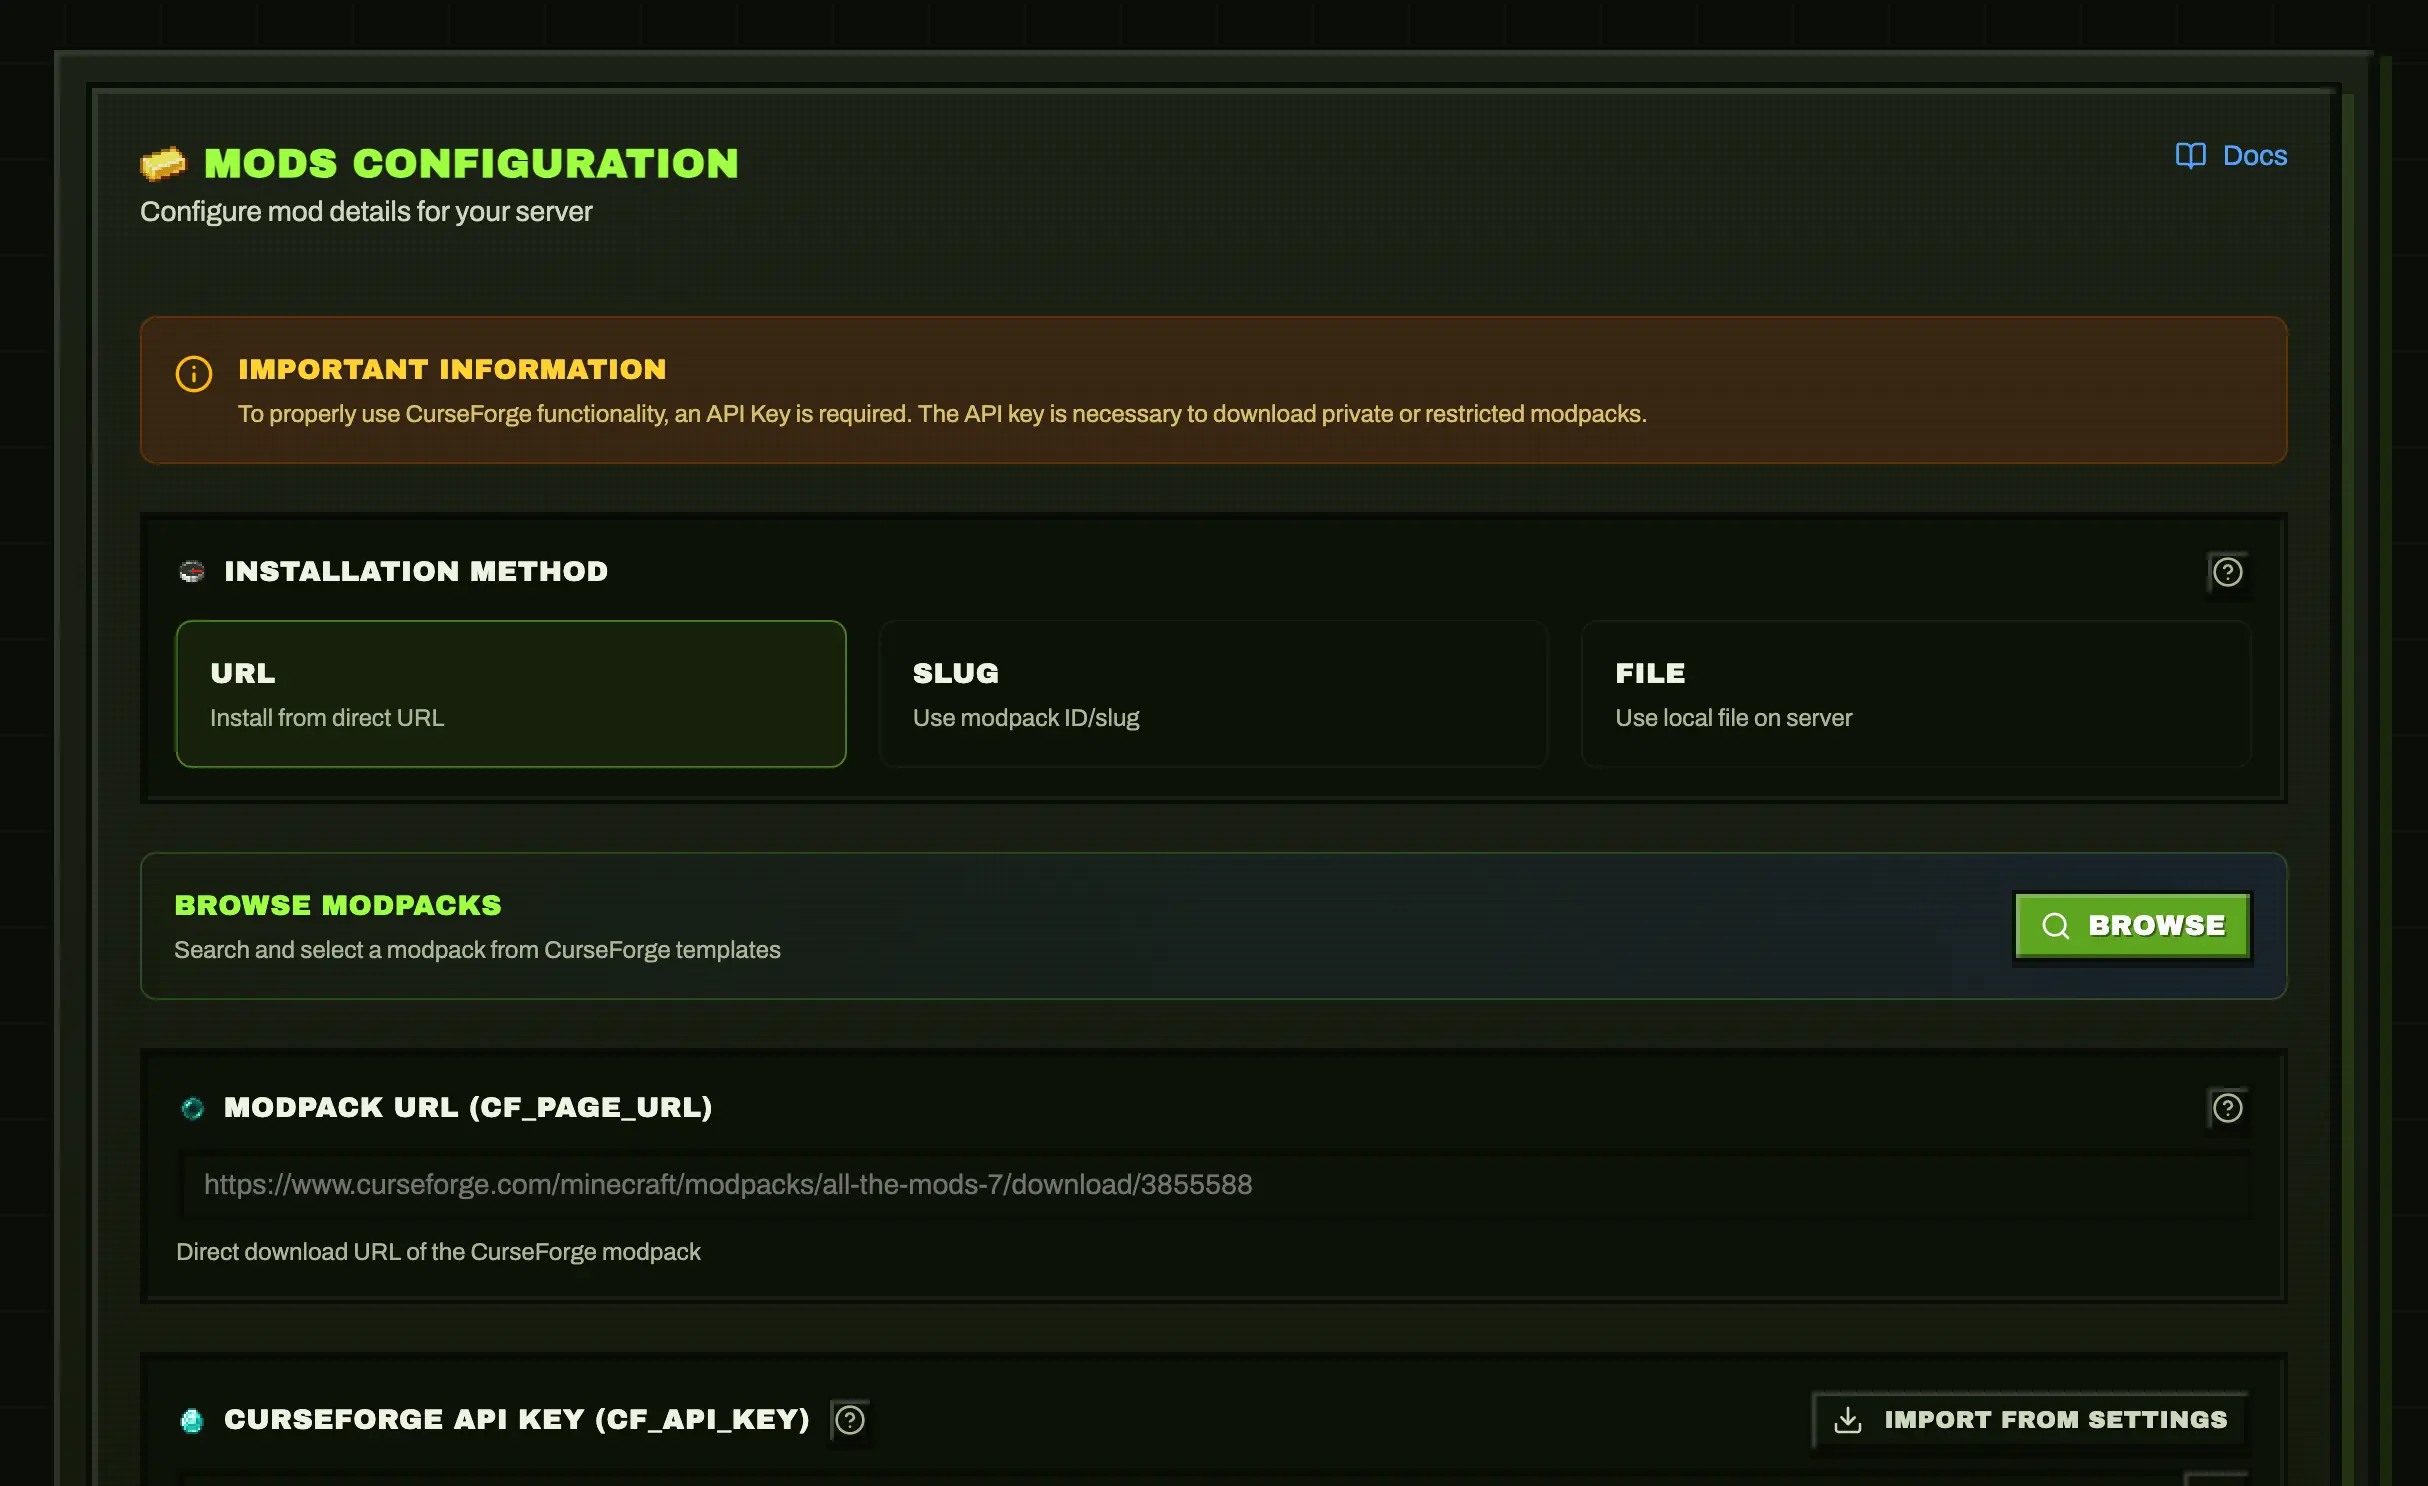
When creating/editing a server with type AUTO_CURSEFORGE, you can choose between 3 methods:
| Method | Auto-updates? | Use case |
|---|---|---|
| URL | ✅ Yes | Always get the latest compatible version |
| Slug | ❌ No | Lock to a specific file version |
| File | ❌ No | Use a local modpack zip file |
Method: URL (Recommended for auto-updates)
- Select URL as installation method
- Paste the modpack page URL from CurseForge
- On each server start, it downloads the latest compatible version
Example URL:
https://www.curseforge.com/minecraft/modpacks/all-the-mods-9TIP
Use URL method if you want automatic updates when the modpack releases new versions.
Method: Slug (Lock specific version)
- Select Slug as installation method
- Enter the modpack slug (e.g.,
all-the-mods-9) - Enter the File ID for the specific version you want
How to find the File ID:
- Go to the modpack page on CurseForge
- Click on "Files" tab
- Click on the version you want
- The File ID is in the URL:
.../files/5765432→ File ID is5765432
WARNING
With Slug method, the version never updates automatically. You must manually change the File ID to update.
Method: File (Local modpack)
- Select File as installation method
- Upload/mount your modpack zip to the server
- Enter the file pattern (e.g.,
*.zip)
Useful for modpacks downloaded manually or custom modpacks.
Use the modpack URL, not the server-file URL
AUTO_CURSEFORGE always expects the modpack (client) page or file — it reads the manifest and builds the server side from it. Pointing it at a dedicated "server files" download breaks with:
Invalid parameter provided for "install-curseforge" command:
The modpack's manifest file was not valid - did you make sure to reference a client, not server file?So use the modpack page URL (e.g. https://www.curseforge.com/minecraft/modpacks/<pack>) or a specific modpack file (.../files/<id>), never the server-files variant.
If the install then loops or crashes on start because of a client-only mod, exclude it with the Exclude mods field (CF_EXCLUDE_MODS), which accepts a comma-separated list of mod slugs or filenames, e.g. optifine,client-only-mod.
World source conflict with Worlds tab
For AUTO_CURSEFORGE, CF_SET_LEVEL_FROM and the Java Worlds tab are alternative world-source mechanisms.
- If you use the Worlds tab (
WORLD/LEVEL), Minepanel clearsCF_SET_LEVEL_FROM. - If you need modpack-provided world data (
WORLD_FILEorOVERRIDES), keep usingCF_SET_LEVEL_FROMand do not select an external world source.
Browse Modpacks
Minepanel includes a Browse button to search CurseForge modpacks directly from the UI. Click it to find and select modpacks without leaving the panel.
GTNH
Minepanel also supports GT New Horizons through the dedicated GTNH server type.
Use it when you want the container to handle GTNH-specific install and update behavior without manually entering env vars.
Available GTNH fields in Minepanel:
GTNH_PACK_VERSIONGTNH_DELETE_BACKUPSSKIP_GTNH_UPDATE_CHECK
Recommended workflow:
- Keep a fixed pack version such as
2.8.1 - Leave update check enabled for the first install
- Only enable
SKIP_GTNH_UPDATE_CHECKafter the server has been installed once
Feed The Beast (FTBA)
Minepanel supports Feed The Beast modpacks through the dedicated FTBA server type. No CurseForge API key is needed — FTB serves the packs directly. The pack pins its own Minecraft and loader version, so you don't set a Minecraft version by hand.
Available FTBA fields in Minepanel:
FTB_MODPACK_ID— the numeric modpack ID from the pack's page on feed-the-beast.com (required)FTB_MODPACK_VERSION_ID— a specific version ID; leave it empty to always install the latest
How to set it up:
- Create/edit a server and pick Feed The Beast as the server type (under Others)
- Open the Mods tab and enter the FTB Modpack ID
- Optionally set a FTB Version ID to lock the pack to a specific version
CurseForge Files (Individual Mods)
Download specific mods/plugins from CurseForge to add to any modded server.
API Key Required
Same API key as modpacks. Get one from CurseForge for Studios.
How to Add Mods from Minepanel
- Go to Create Server or Edit Server (Forge, Fabric, or AUTO_CURSEFORGE)
- Open the Mods tab
- Find the CurseForge Files field (green border)
- Enter mod slugs separated by commas or new lines
- Save the server
Example input:
jei
geckolib
aquacultureReference Formats
| Format | Example | Description |
|---|---|---|
| Slug | jei | Latest compatible version |
| Slug + File ID | jei:4593548 | Specific version |
| Slug + version | jei@10.2.1.1005 | By partial filename |
| Project ID | 238222 | Using CurseForge ID |
| URL | https://curseforge.com/.../jei | From page URL |
Auto-Selection
Without a File ID, the newest compatible file for your Minecraft version is selected automatically.
Docker Compose Reference
Docker-compose examples
Basic mod list:
environment:
  CF_API_KEY: $2a$10$Iao...
  CURSEFORGE_FILES: |
    jei
    geckolib
aquacultureSpecific versions:
environment:
  CURSEFORGE_FILES: |
    jei:4593548
geckolib@4.2.1Using listing file:
volumes:
  - ./cf-list:/extras:ro
environment:
CURSEFORGE_FILES: '@/extras/cf-mods.txt'Combining Modrinth and CurseForge
You can use both Modrinth and CurseForge Files together:
environment:
  TYPE: FABRIC
  VERSION: 1.21.4

  # Modrinth mods (preferred for performance)
  MODRINTH_PROJECTS: |
    fabric-api
    sodium
    lithium
  MODRINTH_DOWNLOAD_DEPENDENCIES: required
  # CurseForge exclusive mods
  CF_API_KEY: your_key
  CURSEFORGE_FILES: |
    some-cf-exclusive-mod
another-cf-modVersion Compatibility
Always ensure mods from both sources are compatible with your Minecraft version and loader type.
Plugin Management (Spigot/Paper/etc)
For plugin-based servers (Spigot, Paper, Bukkit, etc.), you can use Spiget:
environment:
  TYPE: PAPER
  VERSION: 1.21.4
  SPIGET_RESOURCES: |
    9089
    28140
34315Where the numbers are Spigot resource IDs from SpigotMC.
Bedrock Addons
Bedrock Edition uses behavior packs and resource packs instead of traditional mods.
Minepanel now includes an Addons tab for Bedrock servers with two sources:
- Manual upload of
.mcaddon,.mcpack, or.zip - CurseForge import using your configured API key
Downloaded addon files are stored under servers/<server-id>/addons/ and Minepanel syncs enabled packs into mc-data/behavior_packs/ and mc-data/resource_packs/.
When you enable an addon, Minepanel also updates:
worlds/<level-name>/world_behavior_packs.jsonworlds/<level-name>/world_resource_packs.json
Understanding Bedrock Addons
| Type | Extension | Purpose | Client Download |
|---|---|---|---|
| Behavior Pack | .mcaddon | Changes game mechanics | No |
| Resource Pack | .mcpack | Changes textures/sounds | Yes (prompted) |
Both .mcaddon and .mcpack files are actually renamed ZIP files.
Resource Pack vs Behavior Pack
Many Bedrock projects publish the resource pack (RP) and behavior pack (BP) as separate downloads.
- If you import only the RP, Minepanel can activate it, but gameplay logic will not exist.
- If the addon changes mechanics, entities, scripts, UI interactions, or world logic, you usually also need the BP companion.
- The Addons tab shows which packs were detected for each import (
RP,BP, or both).
Installation Steps
1. Open the Addons Tab
Go to your Bedrock server and open Addons.
2. Choose a Source
You can:
- Upload a local
.mcaddon,.mcpack, or.zipfile - Search CurseForge and import directly from the UI
If you use CurseForge, configure your API key first in Settings.
3. Enable the Addon
Imported addons are stored first, then you can enable or disable each one from the list.
When enabled, Minepanel:
- Extracts and registers pack metadata from each
manifest.json - Copies behavior packs into
mc-data/behavior_packs/<uuid>/ - Copies resource packs into
mc-data/resource_packs/<uuid>/ - Rebuilds the world pack JSON files for the active Bedrock world
4. Restart the Server
Restart the server to apply the enabled addons.
If you want clients to be forced to download enabled resource packs, also enable TEXTUREPACK_REQUIRED or set it from the Bedrock settings tab.
5. Force Resource Packs (Optional)
To require clients to download resource packs:
environment:
TEXTUREPACK_REQUIRED: 'true'Or set it in Minepanel's Bedrock settings tab.
Players will be prompted to download resource packs when connecting.
Addon Priority
When two addons modify the same content, their order decides which one wins. The Addons tab lets you reorder installed addons just like the pack screen in vanilla Minecraft:
- Drag an addon by its handle, or use the up/down arrows.
- The addon at the top of the list has the highest priority and overrides the packs below it.
- Each card shows its current priority (
#1,#2, ...).
When you change the order, Minepanel rewrites the world pack files for the active world:
worlds/<level-name>/world_behavior_packs.jsonworlds/<level-name>/world_resource_packs.json
Managed addon packs are written first, in priority order. Packs you installed manually (outside the Addons tab) are preserved after them, with lower priority.
TIP
Restart the server after reordering so the new priority takes effect in-game. Priority applies to the active world only.
Example: Installing One Player Sleep
- Open the server's Addons tab
- Upload
ops.mcaddonor import it from a supported source - Wait for Minepanel to detect the contained behavior/resource packs
- Click Enable on the addon
- Restart the server
Troubleshooting Bedrock Addons
| Issue | Solution |
|---|---|
Pack Stack - None in Bedrock logs | Check world_behavior_packs.json / world_resource_packs.json in the active world and restart after enabling addons |
| Addon appears enabled but has no gameplay effect | Verify you imported the BP companion and not only the RP |
| Version error | Verify the addon contains a valid manifest.json |
| Resource pack not downloading | Set TEXTUREPACK_REQUIRED: "true" |
| Pack conflicts | Check for duplicate UUIDs |
| Server data was cleared | Minepanel keeps downloaded addon files, but applied runtime packs are reset. Re-enable the addons you want to use again |
Notes About Server Data Reset
If you use Clear server data in Minepanel:
mc-data/is recreated from scratch- downloaded addon archives remain in
servers/<server-id>/addons/ - previously applied Bedrock addons are marked as inactive to avoid a broken "enabled but not applied" state
After a reset, go back to Addons and enable the packs you want to apply again.
Best Practices (Java Edition)
- Use Modrinth when possible - Generally faster and more reliable
- Specify versions for production servers to avoid unexpected updates
- Test in development before applying to production
- Keep API keys secure - Use environment variables, never commit them
- Use listing files for easier management of large mod lists
- Document your mods - Add comments in listing files to explain what each mod does
Troubleshooting
Mods not downloading
- Check API key is correct
- Verify project slugs/IDs are correct
- Check server logs for specific errors
- Ensure network connectivity
Version conflicts
- Make sure all mods are compatible with your Minecraft version
- Check mod loader compatibility (Fabric vs Forge)
- Review dependency requirements
Missing dependencies
- For Modrinth: Set
MODRINTH_DOWNLOAD_DEPENDENCIES: required - For CurseForge: Manually add dependencies to your list
Next Steps
- Learn about Server Types
- See all Configuration Options